Guide to Two-Way Switch Wiring, Installation, and Applications
This guide explains how a two-way switch works and why it’s useful. You’ll learn about two common ways to wire them: the modern 3-wire method and the older 2-wire method. The guide also shows where two-way switches are commonly used, and a step-by-step look at how to install the switches, tips to stay safe, and common problems to avoid. It also covers the benefits and the limits of using two-way switches, especially when upgrading to smart systems.Catalog

What is a Two-Way Switch?
A two-way switch allows you to control a single light or electrical load from two different locations. It uses two SPDT (Single Pole Double Throw) switches wired together in a single circuit. Each switch has three terminals: L1, L2, and COM (common). By flipping either switch, you can complete or break the circuit, allowing the light to be turned on or off from either location.

Figure 2. Two-Way Switch with Terminals
In the image, the back of the switch shows the three key terminals: L1 and L2 (used to connect the traveler wires) and COM (which connects to the live wire or load). When the switches are wired correctly, flipping either one changes the path of the current, controlling the light from both ends. Although smart lighting systems are increasingly popular, two-way switches remain widely used. They are simple, dependable, and require no software or connectivity.
How a Two-Way Switch Works?
A two-way switch system lets you control one light from two locations. Each switch has three terminals: one common (COM) and two travelers (L1 and L2). The two switches are connected by the traveler wires (L1 to L1, L2 to L2). The live (phase) wire connects to the common terminal of Switch 1, and the common terminal of Switch 2 connects to the lamp. The lamp's other side goes to neutral. The light turns on when both switches connect to the same traveler wire (L1–L1 or L2–L2), completing the circuit. It turns off when the switches connect to different travelers, breaking the circuit. This means either switch can turn the light on or off, regardless of the other’s position.

Figure 3: Two-Way Switch Diagram
This setup works like an XOR gate: light is on when switches differ, off when they match. It’s fully mechanical, no electronics or software needed. It’s simple, reliable, and widely used in places like staircases and hallways. The diagram shows the phase connected to Switch 1’s common, travelers linked between switches, and the output from Switch 2’s common going to the lamp. Neutral completes the circuit from the other side of the lamp.
Wiring Options for Two-Way Switching
There are two main ways to wire a two-way switch circuit: the 3-wire method and the older 2-wire method.
Modern 3-Wire Method
This is the preferred wiring method for new installations. In this setup, the phase (live) wire connects to the common (COM) terminal on the first switch, while the common terminal of the second switch connects to the light bulb. The neutral wire connects directly from the power source to the other side of the bulb. The two switches are linked by two traveler wires, connecting L1 to L1 and L2 to L2 on both switches.
This method keeps all conductors on the same circuit, ensuring consistent voltage and safer operation. It also complies with modern electrical codes and reduces interference. Because the wiring layout is clean and logical, it makes future maintenance and upgrades like installing smart switches easier.
The diagram shows a modern 3-wire setup. The live wire enters Switch 1’s COM, two traveler wires run between L1 and L2 of both switches, and the output from Switch 2’s COM goes to the light. The neutral wire runs directly to the other side of the light bulb. When both switches align, the circuit completes and the light turns on; changing either switch interrupts or restores the flow.

Figure 4. Modern 3-Wire Method
Legacy 2-Wire Method
The legacy 2-wire method is an older wiring style still found in many older homes. In this setup, the traveler terminals (L1 and L2) are connected between the two switches, just like in the modern method. However, the common terminals are wired differently: one connects to the live (phase) wire, and the other connects to the load (light bulb).
This method functions the same in terms of switching: the light turns on or off depending on the position of the switches. But because the power and load may come from different circuits, this setup can introduce safety risks. It may create loop currents, voltage imbalances, or interference especially dangerous during maintenance or upgrades. Diagnosing faults is harder too, since the wiring isn't part of a unified circuit.
In the diagram, the live wire connects to the common terminal of the first switch, while the common terminal of the second switch connects to the light. The two traveler wires run between L1 and L2 of both switches. The neutral wire goes directly from the power source to the lamp. While this layout may save wire, it increases complexity and safety concerns.

Figure 5: Legacy 2-Wire Method
One-Gang Two-Way Switches
A one-gang two-way switch is a compact version of an SPDT switch, often used in modular wall plates. It has three terminals: COM (common), L1, and L2. Internally, it toggles the connection between COM and either L1 or L2.
When paired with another SPDT switch, it works in the same way as a standard two-way circuit. It’s often used in tight spaces, such as apartments or retrofit installations, where mounting room is limited. The switch can also function in a one-way setup by using only two terminals (COM and L1).
Installation must be done carefully. Incorrect terminal use can prevent the switch from working properly or even cause short circuits. Despite its small size, this switch offers full two-way control while allowing modularity and easy panel integration.

Figure 6. One-Gang Two-Way Switches
Expanding to Multiway Switching
When lighting needs to be controlled from more than two locations, multiway switching comes into play. This system adds one or more intermediate switches between the two main SPDT switches.
Intermediate switches are usually DPDT (Double Pole Double Throw) types. These switches either cross or maintain the traveler wire paths, depending on their position. The full system creates a path that stays closed or opens based on the alignment of all switches involved.
This approach is common in large spaces such as warehouses, long corridors, or rooms with multiple entrances. Although more complex to wire, it offers flexible control from any point. Accurate wiring diagrams and clear labeling are needed, as a mistake at any stage can stop the system from working entirely.

Figure 7. Multiway Switching
Comparing One-Way and Two-Way Switches
|
Feature |
One-Way Switch |
Two-Way Switch |
|
Control Points |
Controls a light from a single location |
Controls a light from two different locations |
|
Switch Type |
SPST (Single Pole Single Throw) |
SPDT (Single Pole Double Throw) |
|
Number of Terminals |
2 |
3 (COM, L1, L2) |
|
Circuit Configuration |
Simple; a single line connects or disconnects power to
the load |
Traveler wires form a loop; both switches influence the
circuit |
|
Wiring Complexity |
Low; fewer wires and direct connections |
Higher; requires more wiring and planning between
switches |
|
Switch Position Behavior |
Fixed ON/OFF position easily identified |
No fixed ON or OFF; depends on the state of the other
switch |
|
Installation Cost |
Lower; fewer components and less labor |
Higher; more materials and installation time |
|
Installation Time |
Quick to install; minimal steps required |
More time-consuming due to extra wiring |
|
Space Requirements |
Minimal; standard switch box fits |
May need routing for traveler wires between locations |
|
Electrical Load Control |
Controls one load from one point |
Controls one load from two separate points |
|
Ease of Use |
Very simple; flip up is ON, flip down is OFF (or vice
versa) |
Still easy to use, but ON/OFF may vary depending on both
switch positions |
|
Failure Points |
Fewer; simple design reduces wiring errors |
More complex; miswiring traveler wires or terminals can
disrupt function |
|
Flexibility & Scalability |
Limited; can’t be extended to more than one point of
control |
Flexible; can expand to 3 or more control points using
intermediate switches |
Two-Way Switch Uses
Two-way switches provide flexible lighting control from two different locations, making them ideal in both residential and commercial settings. Common examples include:
Staircases
Staircases are one of the best places to use two-way switches. If you have stairs at home, you know it can be annoying and even dangerous to go up or down in the dark. With a two-way switch, you can turn the light on at the bottom of the stairs before you go up, and then turn it off at the top. Or, if you're coming downstairs, you can turn the light on at the top and turn it off at the bottom. This makes it much safer to walk on the stairs, especially at night when the house is dark.
Hotel Rooms
In hotel rooms, two-way switches make things a lot easier for guests. One switch is usually by the door when you walk in, and the other is near the bed. That means you can turn the lights on when you enter the room, and then turn them off without getting out of bed. This is really helpful when you're tired or ready to sleep. It also gives the room a more comfortable and thoughtful design, making guests feel more at home.
Open-Plan Homes
Open-plan homes have large spaces where the kitchen, dining, and living areas are connected. These rooms often have more than one entrance, so it's helpful to be able to control the lights from different spots. For example, you might turn on the lights from the hallway and then turn them off near the kitchen. Two-way switches make it easy to manage lighting no matter which way you come in or go out. This adds a lot of comfort and can even help you save electricity, since you don’t have to leave lights on when you’re not using them.
Garages and Workshops
Garages and workshops are busy places where people store tools, work on projects, or park their cars. They often have more than one door, like one from inside the house and one that opens to the yard. Two-way switches make it simple to turn the light on from either entrance. This is very useful if your hands are full or if the space is dark and hard to move through safely. For those who use their garage or workshop often, this type of lighting control can make their work easier and much safer.
Outdoor Paths and Driveways
Outdoor areas like walkways, garden paths, and driveways need good lighting at night for safety and security. With two-way switches, you can control these lights from both the house and another location like a gate or garage. For example, you can turn on the path lights before leaving the house and then turn them off once you’re outside. Or, if you’re coming home at night, you can turn on the lights at the gate and turn them off when you get inside. This helps you avoid walking in the dark and also keeps your home safer by making sure outside areas are well lit.
Installation Guidelines
To install a two-way switch system safely:
1. Gather all tools and materials
Before you start, make sure you have everything you need. You will need two SPDT (Single Pole Double Throw) switches, a light fixture, a length of three-core cable (this includes live, neutral, and earth wires, plus the two traveler wires), and basic safety gear like insulated gloves and safety glasses. Having all your materials ready will help you stay focused and avoid unnecessary mistakes or delays.
2. Turn off the main power at the circuit breaker
Always start by turning off the electricity from the main power source. This is the most important safety step. Working with live wires is dangerous and can lead to serious injury. Make sure the circuit you’ll be working on is completely turned off at the breaker box, and use a voltage tester to double-check that no power is flowing.
3. Connect the live (hot) wire to the common terminal of the first switch
Take the live wire from the power source and connect it to the common terminal (COM) on the first switch. The common terminal is marked or colored differently from the other two terminals (L1 and L2). This is the wire that carries power into the system, and it must be securely connected to ensure a working circuit.
4. Run two traveler wires between the L1 and L2 terminals of both switches
Now, take two wires often called traveler wires and connect the L1 terminal on the first switch to the L1 terminal on the second switch, and do the same for the L2 terminals. These wires form the path that allows the two switches to "talk" to each other and control the light from both ends. Make sure these connections are firm and that there are no loose strands of wire.
5. Connect the common terminal of the second switch to the light fixture’s live input
Next, connect the common terminal on the second switch to the live terminal on the light fixture. This wire carries power to the light when either switch completes the circuit. Without this connection, the light won’t receive any electricity, even if the traveler wires are correctly installed.
6. Connect the light fixture’s neutral wire directly to the power source’s neutral
Run a neutral wire from the neutral terminal of the light fixture back to the neutral wire from the power source. This completes the circuit by giving the electricity a return path. A working light circuit always needs both a live and a neutral wire.
7. Ground all metal boxes and switch covers using the earth (ground) wire
For safety, it's important to ground all metal switch boxes and covers using the earth wire. Grounding protects you in case of an electrical fault by giving stray electricity a safe path to exit. It also helps prevent electric shocks and potential fire hazards. Be sure to connect the earth wire securely to any grounding screws or terminals provided in the boxes.
8. Use a multimeter to check for continuity before restoring power
Before turning the electricity back on, use a multimeter to test the continuity of your wiring. This means checking whether electricity can flow properly through the circuit. You want to make sure there are no breaks or incorrect connections. This step can catch wiring errors that might otherwise lead to a non-working light or worse, a short circuit.
9. Test the switches from both locations to confirm correct operation
Once you’re confident everything is wired correctly, turn the power back on at the breaker. Then, test the two switches by turning the light on and off from both locations. The light should turn on or off no matter which switch you use. This confirms that your two-way system is working as it should.
10. Double-check traveler wire connections if the light doesn't work properly
If the light isn’t working as expected like only turning on from one switch or not turning on at all, go back and double-check the traveler wire connections. These are the most common points of error in a two-way switch setup. Make sure L1 connects to L1 and L2 to L2 across both switches. Also, ensure the commons are correctly wired to the power source and the light. Labeling each wire during installation can help prevent mistakes and make it easier to troubleshoot if something goes wrong.
Benefits of Two-Way Switching
Two-way switches may seem like a small feature, but they offer many practical advantages.
• Convenient Lighting Control: Two-way switches let you control a light from two different locations. This makes everyday life easier especially in places like staircases, hallways, and large rooms. You can turn the light on when you enter and off when you leave from another spot, without walking back to the first switch.
• Energy Saving: By allowing lights to be turned off from more than one place, two-way switches help reduce wasted electricity. You’re less likely to leave a light on just because the switch is far away, which is useful in homes with multiple floors or long corridors.
• Ideal for Large Spaces: These switches are perfect for big homes, offices, and public buildings. In spaces with more than one entrance or exit, being able to control lights from different points adds convenience and improves safety for everyone using the space.
• Simple and Reliable Technology: Two-way switches are mechanical, not digital. This means they don’t depend on software, apps, or internet connections to work. They’re very reliable and rarely fail, which makes them a long-lasting solution with little maintenance needed.
• Works with Smart Systems: Even though they are simple devices, two-way switches can still be used alongside modern smart home systems. They can work with motion sensors, timers, or automation modules, giving you more flexibility if you upgrade your home in the future.
• Low Cost, High Value: Two-way switches are affordable and easy to install, yet they add a lot of value to your lighting setup. For such a small investment, they provide better lighting control, improve safety, and support energy-saving habits over time.
Limitations of Two-Way Switching
While two-way switches offer many benefits, there are some downsides and challenges to consider.
• Requires More Wiring: Two-way switch setups need extra wires compared to single switches. This can be a problem in older homes where electrical boxes and conduits were not designed to hold additional wiring. In some cases, walls may need to be opened up to install new cables, which can increase cost and labor.
• Not Always Compatible with Smart Switches: Many smart switches need a neutral wire to function properly. Older two-way switch setups often don’t have this wire, making it harder to install smart devices without rewiring. This can limit your upgrade options unless you’re prepared for more complex electrical work.
• Can Be Tricky in Older or Custom Installations: In older buildings or systems with custom wiring, the existing layout might not follow modern standards. This can make installing or upgrading two-way switches more complicated.
• Regional Code Differences: Electrical codes and inspection rules can vary by country or even by city. A setup that’s legal in one area might not pass inspection in another. This adds complexity, especially in commercial projects or when selling a home, where everything must meet official standards.
• Troubleshooting Takes More Time: When something goes wrong in a two-way system, it can be harder to figure out the problem. That’s because both switches affect how the light behaves. Diagnosing an issue often requires checking both switches, the traveler wires, and using tools like a multimeter to test connections.
• Needs Careful Planning and Labeling: Because the wiring is more involved, it’s easy to make mistakes during installation if wires aren’t clearly labeled or the steps aren’t followed correctly. Poor planning can lead to confusion or even safety hazards, so taking time to map out the system is very important.
Conclusion
Two-way switches make it easier and safer to control lights from more than one spot. They are great for places like stairs, long hallways, or rooms with more than one entrance. You can turn the light on when entering and off when leaving without walking back. They are simple, cheap, and don’t need apps or Wi-Fi. While they need a bit more wiring and careful setup, they work well for both regular homes and smart homes. Just plan the wiring clearly, follow safety steps, and check everything with a tester before turning the power back on.
About us
ALLELCO LIMITED
Read more
Quick inquiry
Please send an inquiry, we will respond immediately.
Frequently Asked Questions [FAQ]
1. What is the difference between a single switch and a two-way switch?
A single switch controls a light or device from one location only. You can turn it on or off using that one switch, which is fine for small rooms like bathrooms or closets. A two-way switch, however, lets you control the same light from two different places. This is useful in staircases, hallways, or large rooms with multiple doors. It uses two switches connected together so flipping either one can turn the light on or off. The main difference is that a single switch gives control from one spot, while a two-way switch gives control from both ends.
2. How can you tell if a switch is a two-way or 3-way?
To check if a switch is a two-way (3-way in North America), look at the back for terminal screws. A two-way switch has three terminals: one common and two travelers. If you see three screws (excluding the ground), it’s likely a two-way or 3-way switch. If there are four terminals, it’s an intermediate or 4-way switch, which is used in systems with more than two control points. You can also trace the wiring: two-way switches connect to each other with two traveler wires and have a common on each switch. If it’s part of a multi-switch setup and has four terminals, then it’s not a two-way.
3. What happens if you wire a two-way switch wrong?
If a two-way switch is wired incorrectly, the light might not work as expected. It could stay on all the time, not turn on at all, or only respond to one of the switches. The most common mistake is mixing up the traveler wires or connecting the power or light wire to the wrong terminal. This disrupts the switching logic and breaks the circuit flow. In some cases, it can also create a short circuit or cause flickering if power loops are created. To avoid this, always follow the correct terminal markings (COM, L1, L2) and confirm continuity before powering on.
4. How to wire a two-way, 12 volt switch?
To wire a 12V two-way switch, start by connecting the positive wire from the 12V power supply to the common terminal of the first SPDT switch. Then, run two wires from L1 and L2 of the first switch to L1 and L2 of the second switch. Next, connect the common terminal of the second switch to the positive side of the 12V device, like an LED. Finally, connect the negative terminal of the device back to the negative side of the power supply. This setup lets you turn the device on or off from either switch, just like in AC wiring but using low-voltage DC power.
5. What is the common wire on a two-way switch?
The common wire on a two-way switch is the terminal that either receives power or sends it to the light, depending on the switch's position in the setup. On the first switch, the common is connected to the live wire from the power source. On the second switch, the common connects to the live input of the light. The traveler wires (L1 and L2) simply connect the two switches. If the common is miswired, the system won’t work properly either the light won't turn on or only one switch will work. Correctly wiring the common terminals is important for a functional two-way system.

Learn the Different Types of Electric Motors
on June 3th

All About MPC7410RX500LE: Features, Pinouts, and Performance
on June 2th
Popular Posts
-

Complex Instruction Set Computers: How They Changed Computing?
on April 18th 147749
-

USB-C Pinout and Features
on April 18th 111904
-
Using Xilinx Unified Simulation Primitives: A Comprehensive Guide to FPGA Design and Simulation
on April 18th 111349
-

Power Supply Voltages in Electronics: Meaning of VCC, VDD, VEE, VSS, and GND
on April 18th 83714
-

RJ45 Connector Guide: Pinout, Wiring, Cable Types, and Uses
on January 1th 79502
-

The Ultimate Guide to Wire Color Codes in Modern Electrical Systems
The way our electrical systems use colors isn’t just for looks. Each wire color now indicates a specific function, making it easier to identify and handle electrical components correctly during ins...on January 1th 66869
-

Quality (Q) Factor: Equations and Applications
The quality factor, or 'Q', is important when checking how well inductors and resonators work in electronic systems that use radio frequencies (RF). 'Q' measures how well a circuit minimizes energy...on January 1th 63004
-
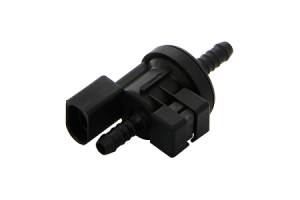
Purge Valve Guide: Function, Symptoms, Testing, and Replacement for Optimal Engine Performance
The purge valve is a key part of a car’s system that helps keep the air clean by managing fuel vapors before they can escape into the atmosphere. This not only helps the environment by reducing pol...on January 1th 62941
-

Achieving Peak Performance with the Maximum Power Transfer Theorem
The Maximum Power Transfer Theorem explains how energy from a source, such as a battery or generator, flows to a connected load. It shows the exact condition where the load receives the most power....on January 1th 54076
-

A23 Battery Specifications and Compatibility
The A23 battery is a small, cylinder-shaped battery with high voltage. Also called 23A, 23AE, or MN21, it runs at 12 volts and much higher than AA or AAA batteries. Its special design make...on January 1th 52087
HOT Part Number
-

LTC4063EDD#TRPBF
Analog Devices Inc.
IC BATT CHG LI-ION 1CELL 10DFN
MIMX8MM1CVTKZAA
NXP USA Inc.
IC MPU I.MX 8M MINI SOLOLITE
APDS-9005-020
Broadcom Limited
SENSOR OPT 500NM AMB 6CHIPLED
06031A820KAT2A
KYOCERA AVX
CAP CER 82PF 100V C0G/NP0 0603
ICM-20602
TDK InvenSense
IMU ACCEL/GYRO/TEMP I2C/SPI LGA
170M4611
Eaton - Bussmann Electrical Division
FUSE SQUARE 350A 700VAC RECT
08053C105JAZ2A
KYOCERA AVX
CAP CER 1UF 25V X7R 0805
EP1C12F324C6N
Intel
IC FPGA 249 I/O 324FBGA
2SC4617T1G
onsemi
TRANS NPN 50V 0.1A SC75 SOT416
TL431AILPRAG
onsemi
IC VREF SHUNT ADJ 1% TO92-3
ADAU1787BCBZRL
Analog Devices Inc.
4 ADC, 2 DAC LOW POWER CODEC, AU
74VHC164MTCX
onsemi
IC SHIFT REGISTER 8BIT 14TSSOP
DAN222M3T5G
onsemi
DIODE ARRAY GP 80V 100MA SOT723
NR3015T470M
Taiyo Yuden
FIXED IND 47UH 300MA 1.608OHM SM
MM3Z18VC
onsemi
DIODE ZENER 18V 200MW SOD323F
1N4001W
Rectron USA
DIODE GEN 1A 50V SOD-123F
SMBJ90A
Taiwan Semiconductor Corporation
TVS DIODE 90VWM 146VC DO214AA
NTA1215MC
Murata Power Solutions Inc.
DC DC CONVERTER +/-15V 1W -
SDR1307-101KL
Bourns Inc.
FIXED IND 100UH 1.9A 180MOHM SMD
AOT5B65M1
Alpha & Omega Semiconductor Inc.
IGBT 650V 5A TO220
STP16CP596B1R
STMicroelectronics
IC LED DRIVER LINEAR 50MA 24DIP
AD7895ANZ-2
Analog Devices Inc.
IC ADC 12BIT SAR 8DIP
MURB1620CTT4G
onsemi
DIODE ARRAY GP 200V 8A D2PAK
STGIPS30C60T-H
STMicroelectronics
MOD IPM SLLIMM 30A 600V 25SDIP
IXDN604SIA
IXYS Integrated Circuits Division
IC GATE DRVR LOW-SIDE 8SOIC
CY7C63743-SC
Infineon Technologies
IC MCU 8K LS USB/PS-2 24-SOIC
U2745B-MFBG3
Microchip Technology
RF TX IC UHF 310-440MHZ 16LSSOP
DSPIC30F4013T-30I/PT
Microchip Technology
IC MCU 16BIT 48KB FLASH 44TQFP
ADF4106BRUZ-RL
Analog Devices Inc.
IC CLK/FREQ SYNTH 16TSSOP
EL8403IS
Elantec
IC OPAMP GP 4 CIRCUIT 14SOIC
8A35001B-001AJG
Renesas Electronics America Inc
NETWORK TIMING
GRM0337U1HR90BD01D
Murata Electronics
CAP CER 0.9PF 50V U2J 0201
LT1356CS#PBF
Analog Devices Inc.
IC VOLTAGE FEEDBACK 2 CIRC 16SO
AON7280
Alpha & Omega Semiconductor Inc.
MOSFET N-CH 80V 20A/50A 8DFN
IRLI540N
Infineon Technologies
MOSFET N-CH 100V 23A TO220AB FP
VI-J6Z-MZ
Vicor Corporation
VI-J6Z-MZ 300V 2V 5A -
LMH6722MA
Texas Instruments
IC AMP CURRENT FEEDBACK 14SOIC
HZM6.8Z4MWATL-E
Renesas Electronics America Inc
TVS DIODE 3.5VWM 3MPAK
LM4041DIM7-1.2
Texas Instruments
IC VREF SHUNT 1% SC70-5
RT6200GE
Richtek USA Inc.
IC REG BUCK ADJ 600MA SOT23-6
R5F21274SNFP#X6
Renesas Electronics America Inc
IC MCU 16BIT 16KB FLASH 32LQFP
1N5227B
onsemi
DIODE ZENER 3.6V 500MW DO35
12102C472JAT2A
KYOCERA AVX
CAP CER 4700PF 200V X7R 1210
PZTA64
Fairchild Semiconductor
SMALL SIGNAL BIPOLAR TRANSISTOR,
XC1765ELSO8C
AMD
IC PROM SER C-TEMP 3.3V 8-SOIC
XR88C92CJ-F
MaxLinear, Inc.
IC UART FIFO DUAL 44PLCC
RT24C2X202
Bourns, Inc.
TRIMMER 2K OHM 0.75W PC PIN SIDE
DLW31SN900SQ2L
Murata Electronics
CMC 370MA 2LN 90 OHM SMD
LMK432F476ZM-T
Taiyo Yuden
CAP CER 47UF 10V Y5V 1812
MOC207R1VM
onsemi
OPTOISO 2.5KV TRANS W/BASE 8SOIC
GRM0335C1E390JD01D
Murata Electronics
CAP CER 39PF 25V C0G/NP0 0201
SE10PG-M3/84A
Vishay General Semiconductor - Diodes Division
DIODE GEN PURP 400V 1A DO220AA
RABS15M REG
Taiwan Semiconductor Corporation
BRIDGE RECT 1P 1KV 1.5A ABS-L
PI74LPT16245AEX
Diodes Incorporated
IC TXRX NON-INVERT 3.6V 48TSSOP